Get annoyed that you still haven't painted said table.
Oh wait, that's me.
Nothing like making you really want to paint something when you have to take pictures of it and blog them for all to see your ugly table.
No likey.
Anyway, lay them out like you what you want the final scarf to look like. Play around with the fabrics, see which ones flow nicely into the next ones.
If one of them is cute, but doesn't totally fit with the rest, put it at the top, or fabric #5. This fabric will most likely be hidden behind the scarf wearer's neck.
 Now all of the fabrics that I am using don't have an up or down. But because I am sure that some of yours do I put two in for illustration purposes.
Make sure that they go the right way.
It might seem simple, but believe you me I have sewn way too many things upside down in my day.
Once you have an arrangement that you love, keep them on the (ugly) table. This is the order that you will pin in.
 In sewing there is a
Right Side
and a
Wrong Side
You might come across the abbreviations RST or WST which stand for Right Side Together or Wrong Side Together.
In general you want to put Right Sides Together and pin on the Wrong side.
 Take the bottom edge of your bottom piece.
Flip it up and on top of the right side of your piece #2. What was the bottom of the bottom piece will now be at the top.
 Pin at the bottom about an inch from the edge.
See how I folded back the piece?
Both of the Right Sides are facing each other.
 After pinning, open up the two pieces, keeping piece #2 still on top.
 Now flip piece #2 on top of piece #3.
Line up the edges, smooth it out and pin.
 Keep working your way around all nine pieces.
 Flipping, lining up, smoothing out, pinning.
Turn the scarf Wrong Side down and check your work.
It should still be in the right order,
None of the Wrong Side should show.
Try it on and look in the mirror to make sure that any directional prints aren't upside down.
 This is what the back should look like.
 Lots of lined up edges all ready to be sewn.
Breathe.
You are doing really, really good.
Now we sew.
I am so excited!!!!
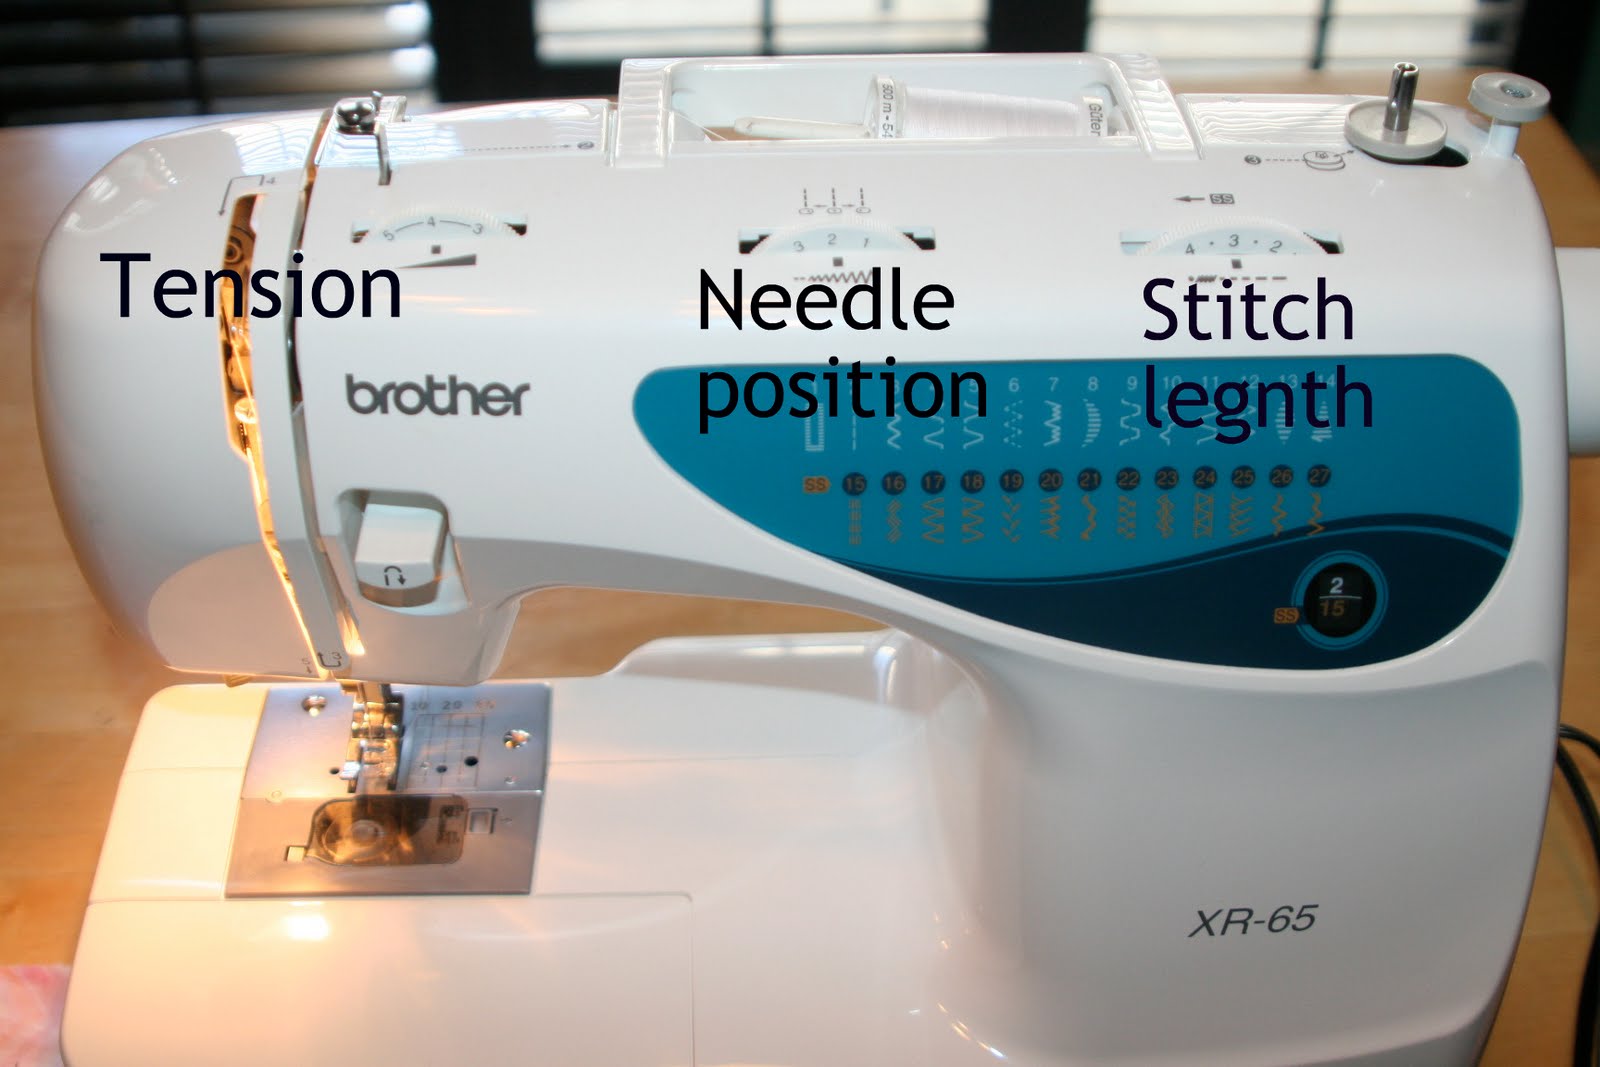
 This is my machine.
This is the settings that I use for normal sewing.
Your machine most likely will be different, but I just wanted you to have something to go off of.
My Tension is set at 4.
My needle is in the center position.
Which is about 1/2 inch seam allowance.
My stitch length is set at 3.
If you did your homework, hopefully you figured out a formula that works best for you.
You did your homework, right?
 Pull up the needle with the knob on the right.
Pull up the foot with the lever.
Put the pinned edge of fabrics #1 and #2 under the foot.
Click this picture enlarge it so you can see how it is lined up.
Put down the foot.
Turn the knob to put the needle in the fabric.
Press the foot pedal slowly.
Stitch a few stitches.
Stop.
 This loopy arrow is the backstitch.
The backstitch locks your row of sewing so it doesn't unravel and make your cry. It is so very, very important that you remember to do a few backstitches at the beginning and end of each row.
For reals important!
After backstitching, press the foot pedal and sew to the end of the fabric.
Then backstitch.
Turn the knob so the needle goes up.
Lift up the foot.
Pull the fabric and thread out 6 or so inches.
Cut the thread.
Most machines have a little razor thing that you pull your thread down on and it cuts it for you.
Move on to the next two fabrics that are pinned together.
Before you line it up under the needle, pull out a bit of thread and bring it to the back of the machine. If there isn't enough thread pulled out, when you begin to sew it will pull it out of the eye of the needle and you'll cry and hate sewing and rethreading, and no longer like me.
So don't do that.
Kaythanks.
Keep doing the above steps until all of the pieces are sewn together.
 Open up all of the seams to make sure there are no gaps where you might have missed some fabric.
 Lay it out on the (ugly) table and admire the awesome.
Good work!
Now to my least fave parts of sewing.
B.OR.ING....
Go to the couch. Get some scissors.
Put something lame on the TV.
Something mildly entertaing, but that doesn't need your full attention.
For me that used to be the Hills. But I am boycotting it since LC left.
Clip all of the hanging threads from each side.
If you don't, they will get in the way later.
Clip, clip, bored, bored.
A.D.D.
(Just me again.)
 Now get your iron out.
Put it on the hottest setting and fill it up with water if you have a steam iron.
Soooo much easier!
Place your fabric Right Side down on the board.
(Ugly table, cute ironing board.)
Iron down each end 1/2 inch.
 Then carefully iron each seam open. Be mindful not to pull the seams and make them all wonky. Just simple pressure and a burning hot iron should do the trick.
 Then grab your nearest cute baby and try it on them.
Because cute babies always make for a good end to a successful sewing session.
Hooray!!!!
You are nearly there.
Gold stars for all.
On Monday we will finish our scarfy goodness.
I am so very proud of you.
Please upload your progress to the Flickr group. I would love to see how you are doing. Plus, it is a great place to get your questions answered by other members and I may or may not be randomly giving scarves away to a few of you cool kids.
Holla!


Posted in scarf along, scarf swap