Okay cold weather friends.
Are you ready?
Is your flannel washed and dried.
Let's go...
 I had to iron my flannel.
The fact that iron and flannel are in the same sentence freaks me out. But I'm taking one for the team.
Open up your flannel.
Line up the edges.
Fold it in fourths with the crazy frayed edges together.
This makes the ginormous piece more manageable and gives you less to cut.
You will be only cutting out one flannel backing at a time.
Smooth it out on your ugly table.
 Lay your lovely scarf on top of the flannel.
Carefully, with sharp scissors cut the flannel the same width of your scarf. I tried to do this with my rotary cutter, but the piece was just to big. Be sure not to cut your scarf, or to let the scarf move. They need to be the exact same size.
 Now unfold the long piece of flannel that you just carefully cut and lay your scarf right side down on top of it.
 Put a pin through both layers every square or so.
 Trim off the remaining flannel.
You might have a lot, or a little depending on how much yours shrunk.
 Save this scrap.
I am not a fan of letting fabric go to waste.
 Get out your fun trim.
If you are making all cozy scarves you might need to go buy some more.
Uphill. Both ways. In the snow.
Sorry.
I'll be sunbathing as you dig out your car to go to the fabric store.
Or buy it here. My new fave trim store in the world. No snow blower required.
 Cut the necessary amount of trim.
 Open up the two layers.
 Lay your trim inside the two layers.
The fun side in.
 Close the two layers with the trim inside.
Pin liberally.
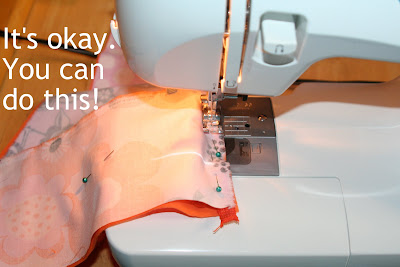
 Go back to your new best friend sewing machine.
Use about a 1/2 inch seam.
Start in the middle of one of the sides.
Line it up with the right side of the foot.
Put the foot down.
Sew a few stitches, backstitch a few stitches, continue sewing down the length of the scarf.
 When you get to a seam where two fabrics are joined, make sure that the seam lies flat under the foot. Bunchy seams mean bunchy scarves.
 When you get to the end of one side don't panic.
 Sew slowly and stop near the edge.
Roll the needle down with the right hand big knob, lift up the foot and turn the fabric.
Breathe.
Here is the only tricky part.
 The trim will be at the left of the foot.
It will want to get in the way.
It will want to make you cry.
Don't let it win. Press it to the side with your fingers. Sew slowly. Take out pins as you go. Don't sew on top of them. Just make sure that you don't go too far to the right. You need to sew through all three layers.
When you get to the corner, put the needle down. Foot up. Pivot the fabric.
Keep sewing up the other side of the scarf, turn at the corner, conquer the other side of trim and start sewing down the other long side.
 You will want to stop sewing about 10 inches or so from where you started.
This will be where you turn the scarf right side out.
When you stop don't forget to backstitch.
 Carefully trim each corner on an angle. Make sure not to cut the stitching.
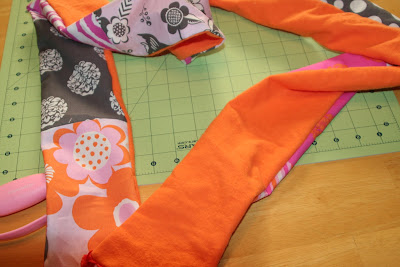 Open up the opening, carefully pull out the scarf from each corner.
How cute is it?
 Get your hot steamy iron and iron it flat and pretty.
Make sure to iron in the opening that isn't stitched yet.
Almost done!
 Take your freshly pressed scarf. On the middle of one side, line it up with the right side of the foot.
Move your needle all the way to the right.
Change you stitch length to 4 or 5.
Now this part is called topstitching.
It keeps the scarf together, closes the opening and makes it cute.
Sew a few stitches, backstitch.
Sew all the way down, stop and turn at the corners, meet up where you began and backstitch.
Now you are done.
Cozy.
Happy.
Done!
Holla!!!!
 Can you stand the cuteness?
 Do you love it or do you love it?
 Remember the scrap I had you save?
Tonight while you are curled up on your couch, grab a needle and thread and make some yo-yo splendor to adorn the end. Cuteness turned up to eleven.
Good job cozy students!
I give you all an A+++!


Posted in project 320, random